DIY Gel Mani
I absolutely love going to get my nails done!
What girl doesn't?
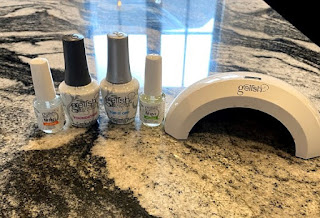
But having a 10 month old child who is always on the go, getting my nails done is a difficult task to go out and do with her. Between feeding and nap schedules, it's near impossible. Luckily my husband hates paying for nail appointments, so a few years ago he bought me a mini gel nail starter kit on Amazon! The one I have is Gelish brand. I use it quite often so I just recently bought a replacement top coat and foundation off Amazon as well. For those wondering, this particular Gelish light is LED.


What girl doesn't?
But having a 10 month old child who is always on the go, getting my nails done is a difficult task to go out and do with her. Between feeding and nap schedules, it's near impossible. Luckily my husband hates paying for nail appointments, so a few years ago he bought me a mini gel nail starter kit on Amazon! The one I have is Gelish brand. I use it quite often so I just recently bought a replacement top coat and foundation off Amazon as well. For those wondering, this particular Gelish light is LED.

Here are 7 easy steps to getting a salon gel manicure at home:
1. Start by giving yourself a manicure. I usually trim/ file my nails and do my cuticles. I always get yelled at by the manicurist at the salon for doing this myself so maybe just push your cuticles back.
2. Then I clean my nails with rubbing alcohol and a paper towel to make sure I don't have any residue on my nails so the gel polish stays better.
3. Next you should apply the pH bond to all of your nails. You do not need the light for this step. This helps bond the foundation to your nails.
4. Apply a thin layer of the foundation to your nails. I am right handed so I typically separate my nails into 3 sections: left hand (pinky to pointer), thumbs, and right hand (pinky to pointer). The light is about 30 seconds. I paint the first section and cure under the light, then thumbs and cure, and so on.
5. Once you have used the LED curing lamp on every nail with foundation, you can apply whatever color you choose. I would start with 2 layers of color (curing in between). You can apply a 3rd layer if needed.
6. Once your nail color is to desired shade, you can apply the top coat. Use the LED curing lamp twice on each section to make sure the top layer is strong.
7. Finally, I take an additional paper towel and wipe each nail with rubbing alcohol to remove the sticky residue from the top coat.

Some tips to remember are as followed:
- A paper towel is better than cotton balls when using the rubbing alcohol because you don't want any fuzz to stick to your nails.
- Use very thin coats when applying the polish. This will make the drying process easier and your nails won't feel clumpy.
- I typically do 2 layers of the color I choose. Sometimes you will need to use a 3rd layer if you can see the nail through the color.
- You can use any LED nail polish together. You don't necessarily have to stick to one brand. Although I like the Gelish brand, I recently bought a color from Red Carpet brand and it works just the same with the Gelish foundation and top coat.
- You may apply a nourishing cuticle oil to your nails after you are done if they are drying out from the rubbing alcohol.

Here is the finished project! Do not get discouraged if your first try isn't as amazing as the professionals! You will get better each time you practice. The gel polish is not the same as painting your nails with regular polish. It does take some getting used to, so be forgiving with yourself and you'll get the hang of it!!
*As an Amazon Associate I earn from qualifying purchases.
*As an Amazon Associate I earn from qualifying purchases.


Comments
Post a Comment